I've been asked a couple of times for a tutorial on this type of card, so here it is!
This is the card that I will be showing you how to create....
So, here's how you can put it together....
I am using these stamps from Hobby Art (fantastic stamps, excellent value for money and a great stamped image all the time)....
So to start the card I cut an 11x11cm, a 9x9cm and a 7x7cm from white card stock. Then I cut the matting layers for each of these squares. So an 11.5x11.5cm, 9.5x9.5cm and a 7.5x7.5cm square from patterned paper.
Put the patterned papers to one side for the minute.
Put a little piece of double sided tape onto the center of the two largest squares. Make the tape a little less tacky by pressing it against some fabric or by rubbing it lightly with your fingers.
Layer these squares on top of each other as shown here.
Go ahead and stamp your design all over the layered squares.
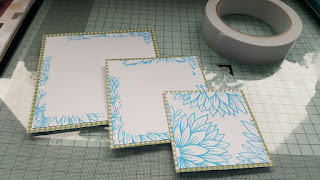
When you separate your squares they will look like this....
Layer these onto your patterned paper squares.
Match up the design and fix into place. (I have used double sided tape to do this but you could use 3d foam pads for extra depth).
Fix onto your card.
To finish my card I have added some colour to the flowers, used some ribbon and a greeting...... and of course as it's me, there had to be some adhesive stones.
Here are two cards, made with the same stamp set. It's an easy to do technique that gives great effect.I hope you found this useful. Let me know if you use it, I'd love to see what you create.
Happy crafting
Nikki x


