Friday, 30 November 2012

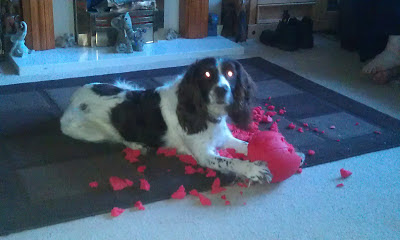
Take one large foam ball...

add one mad spring dog..... and what do you get....

this......................


"we didn't do it mummy! It was Kris"

Oh how I love my little springy pupsters.....
Bless them...

Don't even get me started on the balls from the beanbag that are hidden everywhere..... oh wait a minute.... that was Kris and I...
It's a very happy mad house that we live in..

Nikki x

A little Angel

Wow - where on earth did the last week go.......
This time of year is just manic, so many things to try and cram in and no time left to do it all in......
It's my turn over on the WOW blog again today.
It would be great if you can pop on over and visit us...
This is what I made for my project..... you will find the links for the items I used over here.....

This is what I created,


 sparkly..

I hope you like it....
Nikki x

Monday, 26 November 2012

A little more Tulip

Wow - time just flies when you are having fun!
This time of year is always really busy,and I swear someone has stolen a few hours from each day....

November is flying past - not long till the day arrives..... do you know Kris and I saw a couple of Christmas trees and houses decorated this week!!! Let the madness begin....
I had some exciting news this week, I am just dying to tell you all, but I have been sworn to secrecy for at least a little longer... as soon as I can tell you though, I will do a massive post on it! lol

In the mean time,
Here are a few more of the Tulip demo cards that I wanted to show you....


I thought I was soooo organised for Christmas, turns out not so much!
Better get on with it pdq!!

What's on your list for Santa this year?

Nikki x

Wednesday, 21 November 2012

Tulips in November...

Well not the flower Tulip....... but the range from Do Crafts.
These were some of the cards I made at my demo when I went to visit the fantastic shop that is Letham Crafts... I'm telling you, it's a must visit shop on the crafters list - this place is a little bit of Heaven for a crafter.... the staff are all so friendly and welcoming, there is a wonderful cafe - all the stuff is homemade and totally yummy! But they also stock just about everything in that shop!
I never know how on Earth they find anything. But they do! It's an Aladdin's cave..... Go see for yourself....
Back to the cards..... lol
Here are some of the cards I made that day.....


 I think one of the most popular images this year has been the Tulip snowman....
What have you been up to? Pop your link onto this post if you'd like me to come over and visit your blog..... it's always nice to get to see what you have been up to and leave some crafty love.

Happy craftin'
Nikki x

Friday, 16 November 2012

Stampin.......

So I've been getting inky fingers again....
I do love stamping.... that's why I love working with embossing powders too - a new WOW blog post will be coming up from me very soon.....

But for these cards I was playing with some of the Tulip range of stamps from Do Crafts.

Here are the cards I made,


Just some very simple little cards - they are great to have up your sleeve when you have a pile you need to make or if you are in a rush...

I had better get a move on with mine.... I've got a few commissions to do too....... gulp!
Have a great weekend.
Nikki x

Thursday, 15 November 2012

Boffle'in

Well good morning blog land......
The Autumn leaves are now in lovely big piles under the trees... perfect for kicking when I am out walking the dogs.... the colours are just beautiful....

I found this on facebook just the other day - I really like it! (although at the moment, I would change tea for coffee.....)


When I was up in Letham doing a demo, I promised that I would put a few pics from the day up.... so here are a few using the uber cute Boofle range....

 Aren't these little chaps just adorable....
 They have all been coloured in with the new Artiste pens from Do Crafts...
Two little pupsters sitting at my feet just dying to get out and play in the leaves, so off for now....
But I'll be back soon to share some more things with you.

Happy crafting
Nikki x

Tuesday, 13 November 2012

Licensed to chill....

I do love a challenge and when I was given the commission of creating a Bond themed card for a soon to be 50 year old lady, I really did have to get my thinking cap on.
I had soooo many different ideas but this is the one I went with.....


I used 3d foam pads to lift the top layer. And I just had to add some sparkle with my good old glitter glue....
I know the people who are giving the card loved it, so I just have to hope that Caroline liked it too....

Lots to do this week - so much for getting to take things a bit easier for a while.... lol

I'll be back with some more makes to show you later on.
Whatever you are doing today, have a fab one!!!!
Nikki x

Friday, 9 November 2012

Time Lord.....

I had another challenge last week - make two Dr Who themed cards for a little boy.....
I do love a challenge...

I made this one using Do Crafts Digital Designer..... oh I do love my Digital Designer..... you can take any photo or picture and play around with it....... did I say I love it!!!?!!! lol

I did have a lot of fun making it and playing around with all the elements....
For the second card, I thought I would make a Tardis........
It took me quite a while to get it right, but it was a lot of fun and I am really pleased with the results.....


I hope he liked them.
What do you think?

Not going to be near a computer for the next few days....
But, I'll be back next week with lots more to show you and a few more tutorials.
Have a very crafty weekend!
Nikki x

Wednesday, 7 November 2012

1 stamp - 5 different cards

I love love love snowflakes..... they are beautiful.
I adore snowflake stamps too - they are so easy to use for so many different techniques.

I took a few snowflakes from my stamp set to create a stamp on my acrylic block. Then came up with 5 different cards, all using the same stamp.
These are the cards I came up with,

 This design has to be one of my favourites this year. So quick and easy to do. And - flat! So not extra post.... I think it would be lovely as a birthday card too, I'll just change the snowflakes for flowers.

 For this one I placed a post it note in the middle of my card and then just stamped all over the front of the card. By not re-inking every time you get a lovely shade effect - it adds a lot of tone and depth to your card.

 I did the same with this one, only this time I put the post it note on the diagonal and inked the edges of the post it too.

 For this one I stamped over the front 3/4 of the card, then I cut the remaining 1/4 away - following the pattern of the snowflakes. I used post its to mask off the area on the inside of the card and then stamped the side panel.

I did the same with this card, only this one is a square card.
To finish off all the cards I added glitter and adhesive gems.

It's a quick and effective way of getting lots of cards done...

Whatever you are doing today - enjoy!
The weather here is just perfect to stay warm inside and craft away.

Nikki x

Monday, 5 November 2012

A simple snowflake....

..... when you know how.....

Over the past few months I have been demoing this all over Scotland (and from what I gather Ireland have liked this one too!)....

This is the finished snowflake.......


And this is how you make it....


 You will need 9 large squares and 10 smaller squares (if you wanted to have a thinner snowflake then only do one of the layers). I have used this xcut die to give it a decorative edge, you could used a border punch if you preferred.
 Take each square and score from the bottom corner to the middle of the opposite two edges. Use this picture as a reference guide.
 Crease these lines - make the pattern on the inside as is shown on the above photo.
 When you have done this on all the squares, stick them together.
I use a pva glue and I hold them together with paperclips until they are dry.
If you are in a hurry, you can use double sided tape.
 Continue until you have completed both snowflakes.
 
Remove the paperclips and fold over the edges so they lie flatter. Place the smaller snowflake over the top of the larger on and hold in place with a large brad.
You could also use silicone glue and a paper disk.

This one I made using vellum..... isn't it pretty.....


I hope you like this little tutorial.
I'd love to see your version of these, remember to stop by and leave me a link to your blog so that I can any you make.
Happy crafting,
Nikki x


Thursday, 1 November 2012

In a very happy place...

It really doesn't take a lot to please me these days!
Look what arrived for me at work yesterday -


I love love love them!!!!
So, just to warn you all.... if you stand still for long enough you WILL get post it noted!!!! lol

I've been crafting too - I was asked to make a well done card for a little boy who did very well at school over the last term (a very very proud Nana commissioned the card).
This is what I made for him....


Off to get some things made.... watch this space for a snowflake tutorial coming very soon!!!

Happy craftin'
Nikki x